 Welcome satellite scout! This web page is for eVscope users who want to learn how they can participate in our newest science campaign and record satellites as they pass overhead. Note that this web page is best viewed on desktop. Some of the images will be cutoff on smaller screens which makes it tough to follow along.
Satellites are bright, fast-moving little buggers and intentionally catching one in your field of view is no easy task. However, once you’ve got the method down, you’ll feel like you’re in a western; quick-drawing your eVscope in rapid-fire succession to catch the satellites one after another. We’ve put together a few tools and this handy tutorial to help observers get up to speed.
How to Find Satellite Targets:
Because satellites in low-Earth orbit are so close to Earth, where they appear to be in the sky will change dramatically depending on your observing location. To help with this, we’ve put together a few scripts that will search for satellites in your field of view based on the given location and observation time. Currently there are 4 different options for observation targets: Starlink Generation 1, Starlink Generation 2, OneWeb, and Kuiper. Starlink Generation 1 and OneWeb have the greatest number of possible targets but try all of them to see what’s available in the sky. Click one of the links below to get started.
Starlink Generation 1 – https://colab.research.google.com/drive/1P8pVLgyM2pNp4g_EShB6lESDMv52d92T?usp=drive_link
Starlink Generation 2 – https://colab.research.google.com/drive/1r49cvdKMak6IwFeqxKbrdwUupZAoOW5L?usp=drive_link
OneWeb – https://colab.research.google.com/drive/1wKu_aYCFfV8RJjhT2LdVvQ1AHkyw1kA3?usp=drive_link
Kuiper – https://colab.research.google.com/drive/11SHIkpTS8-QGpt5zlD66T2EzD-dkcuoA?usp=drive_link
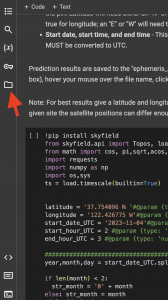
Click any of the above links and you’ll come to a page that looks like this (if you’re on desktop. Mobile will have all of the same information but shifted around a bit):

Be not afraid, the most important part is in the bottom right
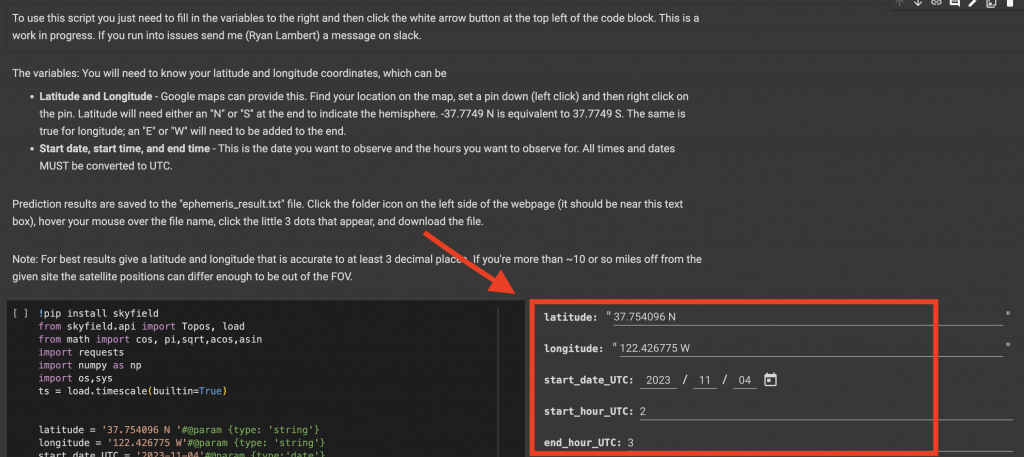
The highlighted inputs in the image above give the script your observing position and time, so that it can check which satellites are visible for you. Look up your latitude and longitude coordinates. This can be done using google maps. Input your observing coordinates into the spaces provided and be sure to add a direction indicator (“N”/”S” for latitude and “E”/”W” for longitude. Don’t try to spell out the whole direction.). Negatives are allowed as well, just remember that a longitude of -122 E is the same as 122 W. Next, decide what time and date you want to observe, convert that to UTC (google will also do this for you if you ask it to) and then input those values in the space provided as well.
Once you’ve added your observing information find and click the start button. On desktop you may have to move your mouse over the code for the start button to appear.
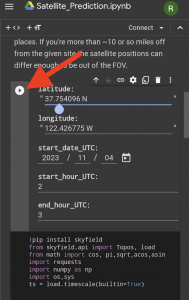
On a mobile phone
or

On desktop
This script will now run. It may take a few minutes so be patient. You’ll be able to tell when it’s finished when the start button returns to normal.
Getting the Target List
For mobile users:
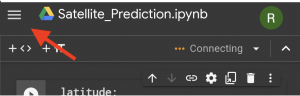
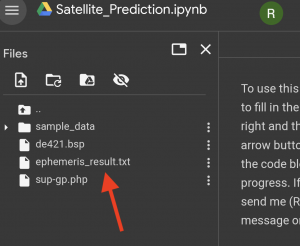
To find the generated ephemeris first click the 3 lines button in the top left
From the dropdown menu select “Show file browser”
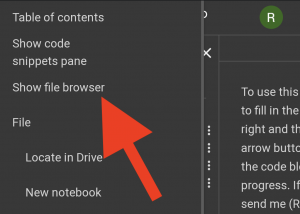
Finally, you can download the ephemeris_result.txt file or click on it to open the file
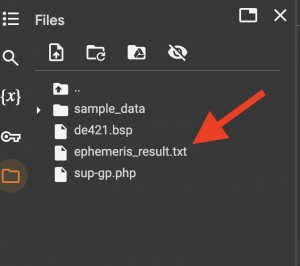
For desktop users:
Click the folder icon in the sidebar
You can download the ephemeris_result.txt file or click it to open the file.
This ephemeris file contains all of the satellites that will pass overhead during your observational time window! Next let’s go over what this file contains and how to read it.
Reading the Ephemeris File and Choosing Targets
If you followed the above steps you should have a text file that looks something like this when you open it:
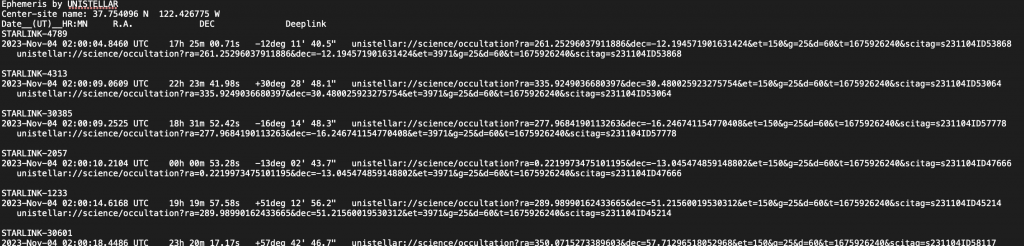
Each line contains information about a specific satellite that will be visible at your location. Let’s walk through what information one of these satellite targets contains. For now don’t worry about what look like 2 web urls. Those are called “deep links” and we’ll cover them in a second.

Each possible target starts by naming the satellite. In the above image, we’re looking specifically at Starlink-4789 (let’s see how creative your names are when you have to think of thousands of them…). The date at time of the transit is the first bit of information given to us – Starlink-4789 will be moving across the sky on November 4th, 2023 at 2:00:05 UTC. The second bit of information is the Right Ascension of the satellite at the transit time – Starlink-4789 will be at RA = 17h 25m 00.71s. The last bit of information is the Declination of the satellite at the transit time – Starlink 4789 will be at Dec = -12 degrees 11′ 40.5″. Put all of this information together and we can tell where exactly Starlink-4789 will be on Nov. 4th, 2023 at 2:00:05 UTC, which means that we can catch it with our eVscope.
Important: When choosing a target make sure you have enough time to slew your telescope and put the observing information into the Unistellar app. When first starting out it’s better to pick a target that will be in the sky in ~5-10 minutes. This will give you plenty of time to slew the telescope, put the observing information in, and otherwise make sure you’re ready to observe. Remember, it’s always better to have to wait a bit because you were too quick than it is to have wasted your prep by getting to where the satellite was after it has already passed.
Also be aware that satellites are best observed up to 2 hours after sunset or 2 hours before sunrise! Satellites are bright because they’re reflecting the Sun’s light towards us. As you can imagine, this is highly dependent on the angle between you, the satellite, and the Sun. You might get lucky and see a bright one in the middle of the night, but you’ll find a lot more duds than hits in your list if you’re observing in the middle of the night.
Using Deep Links
Let’s talk about those strange urls at the end of each satellite event in the ephemeris text file.
These little weirdos
These are called deep links and for certain phones and web browsers, they’ll take you directly to the Unistellar app, handily inputting all of the important information for you. Try copying the first url and pasting it into your phone’s web browser – if you’re taken to the Unistellar app, congrats! You are ready to observe! Skip to the “How to Observe Satellites” section. If that didn’t work head to the section below.
How to Manually Input Observing Information

We’ve all been there. My own phone can’t handle deep links.
If deep link didn’t take you to the app, no worries. You can still observe, it’ll just take a few extra steps. For this tutorial I’m going to assume you already know how to use the Unistellar app and you’re already connected to your eVscope/done a field orientation.
1) Open the app and go to Science mode
2) Choose the “Occultations” Science campaign
3) Input the Right Ascension and Declination of your satellite target from the ephemeris file
4) As the telescope slews to the target input the following Observing Parameters:
- Exposure Time: 150 ms
- Gain: 25 dB
- Duration: 1 minute
That’s it! We’ll cover why you need to below, but after this observation be sure to take another observation with an exposure time of 4 seconds instead before moving the telescope to your next target.
How to Observe Satellites
You’ve created a target list, you’ve picked a target, you’re telescope is pointing at the correct spot in the sky, and your eVscope has the observing parameters it needs. Now what? Each observation takes 1 minute, so try to start the observation about 30 seconds before the satellite is supposed to pass by.
In the case of our example above, Starlink-4789 passes through the field at 2:00:05, so at 1:59 UTC (6:59pm PDT at the time the ephemeris was generated) I’d count to 30 and then start recording. If you keep an eye on the app you will probably see the satellite passing through the field. It’s surprising how accurate the prediction is!
Don’t overly worry about starting the observation exactly 30 seconds before the satellite passes through the field. As long the eVscope is recording when the satellite flies by, the observation is a success!
BUT WAIT – You aren’t done yet! A follow up observation is needed! In order to get an estimate for how bright the satellite is we need to compare it to stars in the field. One thing you may have noticed though is that very very few stars are bright enough to appear at such short exposure times. We need to take an observation with a longer exposure time so we have stars to compare the satellite with!
If deep links work, use the second deep link given for that satellite. If deep links do not work, then, without moving the eVscope, go back into Asteroid Occultations mode, skip the input for RA and Dec, and take another observation with an observation time of 1 minute, gain of 25 dB, and exposure time of 4 seconds.
Once the follow up observation is complete, you’re done! Congratulations on your (hopefully) successful satellite observation!
Reporting Your Observation
Once you are done observing for the night be sure to report your satellite observations in this google form. Try your best to report each of the satellites you observed. After that, we’ll begin working on your data once you’ve uploaded it from your eVscope!